
Filming is quick, reviewing the video takes time
Video has taken hold in the field: a phone is enough, you can talk while filming, and nothing is missed between two photos.
| Situation | What gets filmed | What you need from it |
|---|---|---|
| Building walkthrough | Roof, façade, foundation, parking | Each defect, where it is and how serious |
| Move-in or move-out of a large space | Warehouse, commercial unit, apartment | The damage present on a given date |
| Equipment and fleets | Machinery, vehicle before and after rental | Wear, corrosion, damaged parts |
| Construction handover | Completed work, room by room | Deficiencies to fix before acceptance |
The problem comes afterwards. For a fifteen-minute walkthrough, you have to:
- watch the whole video;
- pause at each defect and take a screenshot;
- note the time, to be able to go back to it;
- circle the defect on the image;
- write the finding into a spreadsheet or a report.
That is often where videos stay on phones, and the report gets written from memory.
What happens when you drop a video into Scanee
The project
In Create a project, choose the Video Inspection & Damage Analysis template. It creates ten fields:
| Field | What it holds |
|---|---|
| Defect Timeline & Markers | The list of key moments, on the original video |
| Timestamp (seconds) | The moment the image comes from |
| Visual Defect Outlines | The boxes drawn around the defects |
| Component / Area | Roof, foundation wall, gutter… |
| Defect Type | A list: corrosion, crack, leak, wear… |
| Severity Level | Low, Medium, High or Critical |
| Damage Description | What can be seen, in text |
| Intervention Type | A list of work to schedule |
| Technical Advice & AI Recommendations | Suggestions from the AI, to review |
| Estimated Cost ($) | An indicative estimate, to confirm or remove |
The options in the Defect Type and Intervention Type lists are general. Before the first video, replace them with your trade's vocabulary: for a roof, for example "Lifted or missing shingles", "Flashing to redo", "Moss to clean".
The template is designed to split videos. Before dropping one in, open the project settings, Batch Scanning & Document Splitting section, and check that Enable Video Splitting is ticked and saved. A video dropped in without this option is analyzed as a whole, without separate images.
Two levels in the list
Once the video is dropped in (MP4, MOV, AVI, MKV or WEBM, up to 1 GB), Scanee watches it in full and spots each moment where a defect is clearly visible. Two moments that are too close together are merged.
- The original video, marked Batch, moves to the Split status. It keeps the full video and the Defect Timeline & Markers. The play button on each moment (Jump to this timestamp in video) takes the player to the right second.
- One image per key moment, marked Doc 1, Doc 2, Doc 3… It's a still image extracted at the exact second. The AI draws the boxes on it and fills in the full record.
Each image thus becomes a document of its own, which you check, correct and export like a photo.
Five rules for filming a usable walkthrough
- Hold still for two or three seconds on each defect. The image is extracted at a precise moment: if the camera moves, the image is blurry.
- Show the context, then move closer. A wide shot places the component; the close-up shows the defect.
- Avoid fast pans. While walking, turn slowly.
- Watch out for backlight, going from a dark room to a window, or under an eave.
- One video per area or per building. Shorter videos give batches that are easier to review, and stay under the 1 GB limit.
Complete example: a 15-second video, three images
We dropped in a 15-second test video, edited from two shots of a house: the roof, then the bottom of a foundation wall, joined by a crossfade around the seventh second. Scanee pulled three images from it (the test was run in French; the labels are translated here).
| Image | Moment | What is outlined |
|---|---|---|
| Doc 1 | 0 s | Moss growth and build-up of plant debris; degraded, lifted and missing asphalt shingles; rusted and deteriorated metal chimney flashing |
| Doc 2 | 7 s | An image taken during the crossfade between the roof and the foundation |
| Doc 3 | 8 s | Diagonal structural crack and moisture; efflorescence and traces of moisture; crushed and damaged gutter or downspout |
The second image shows why the batch needs reviewing: taken during a transition, it adds nothing to the report. On a real walkthrough, a camera movement between two areas can produce the same kind of image. The inspector sets it aside and keeps the sharp views.
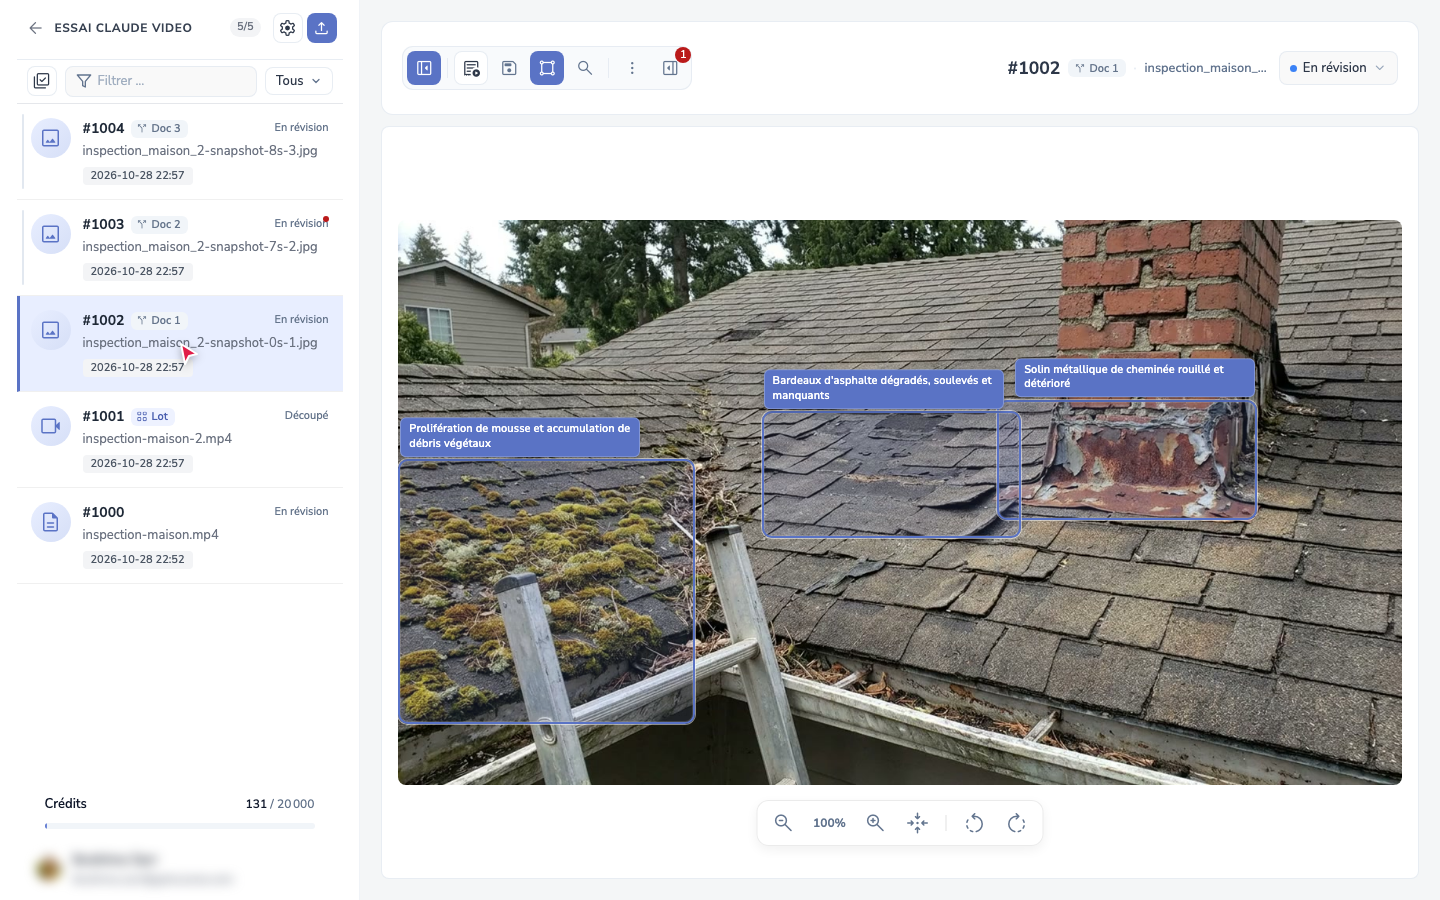
On the roof, three defects are outlined separately. Each can get its own treatment: clean the moss, replace the shingles, redo the flashing.
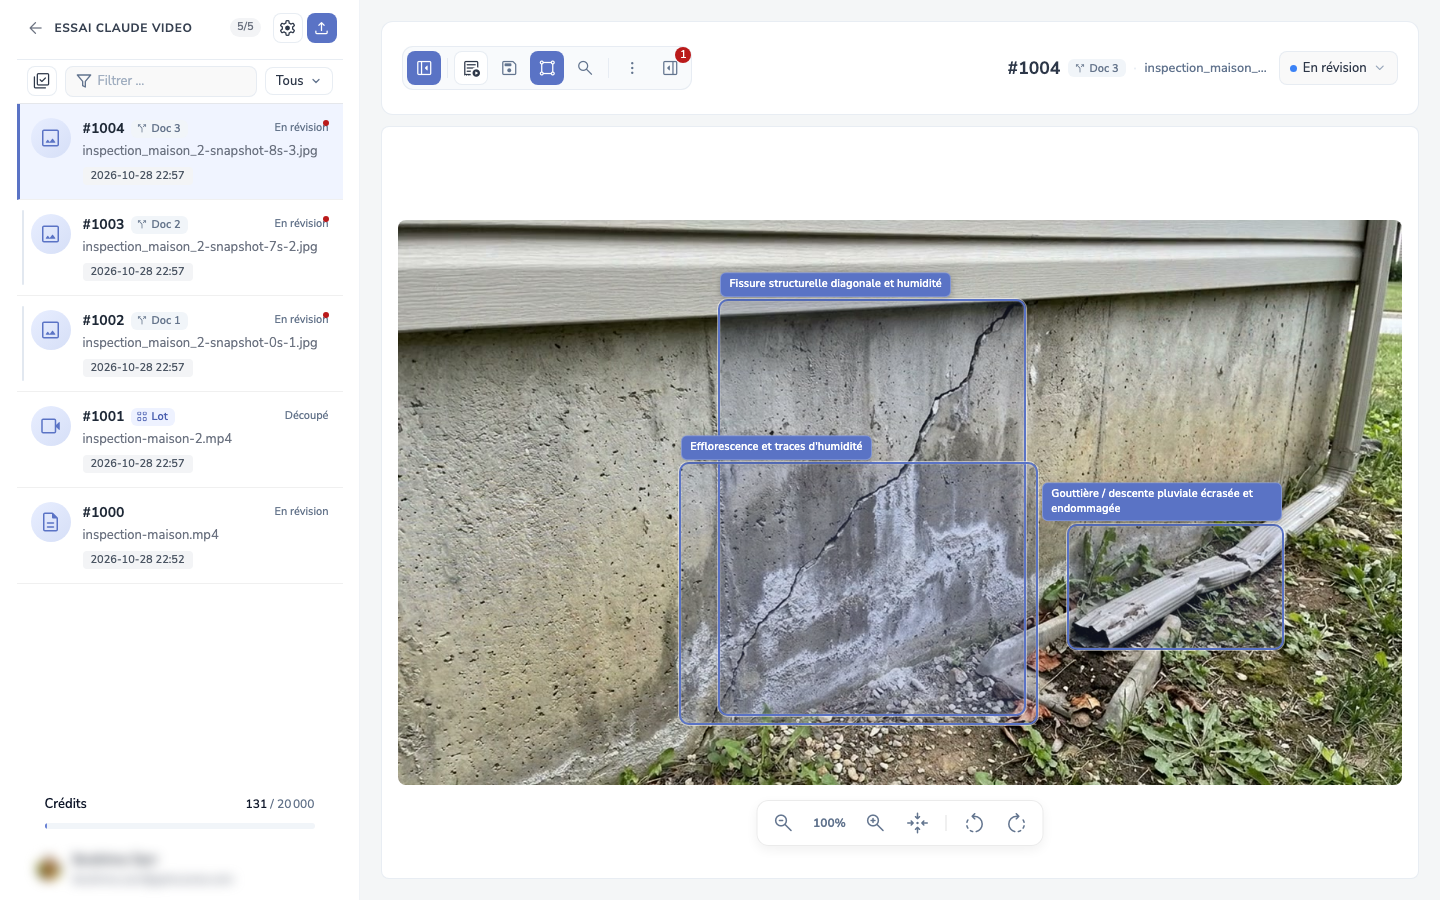
On the foundation, the AI links the crack and the moisture, and spots the crushed downspout right beside them, a possible cause of the water at the foot of the wall. Confirming that link is the inspector's job.
Without splitting: a single record
We also dropped the same video into a project where Enable Video Splitting had not been saved. Scanee then analyzed it as a whole, and filled in a single record, on the moment it judged most important (translated from French):
| Field | Suggested value |
|---|---|
| Timestamp (seconds) | 8 |
| Component / Area | Concrete foundation and gutter downspout |
| Defect Type | Crack / Fracture |
| Severity Level | High |
| Damage Description | Large diagonal crack running through the concrete foundation wall, with efflorescence and traces of moisture… |
| Technical Advice & AI Recommendations | The diagonal crack suggests differential settlement, possibly worsened by rainwater infiltration… |
The record is right about the foundation, but the roof has vanished from the report: three defects on the roof, not a single row. That is what splitting is for: one record per defect, not one record per video.
Where human judgment comes in
For each image, the record suggests a component, a type, a severity, a description, an intervention, advice and an estimated cost. These are suggestions made from a single image:
- severity and intervention are confirmed on site or by a specialist;
- the Technical Advice & AI Recommendations is a drafting base, not an engineer's opinion;
- the Estimated Cost ($) is indicative. If your report must not include an estimate, remove the field from the project.
You correct directly in the record: remove a box with one click on its cross, add one with Draw a zone, change the severity or the intervention. On the original video, you can adjust a moment in the timeline, Sync with current video time, or add one with Add.
The report
The template prepares two exports: Video Inspection Report (JSON) and Video Inspection Report (CSV), one row per defect. You can also export to Excel or connect the project to Google Sheets. See Set up an export and Connect Google Sheets or Excel.
The trial lasts 14 days, with no credit card: try Scanee. To find out where your videos are hosted and how long they are kept, see Security and privacy.
Frequently asked questions
Which video formats are accepted, and up to what size?
MP4, MOV, AVI, MKV and WEBM, up to 1 GB per video. For a long walkthrough, film one video per area.
Why wasn't my video split into images?
Splitting applies when the video is dropped in. Check that Enable Video Splitting is ticked and saved in the project settings, then drop the video in again. Re-running the analysis on a video already dropped in doesn't split it.
Can I add a moment the AI didn't pick?
Yes, in the Defect Timeline & Markers of the original video: move the player to the right moment and click Add. On each extracted image, you can also outline a missed defect with Draw a zone.
Is the estimated cost reliable?
It is indicative. The AI suggests it from a single image, without measurements or a site visit. Use it as a rough order of magnitude, or remove the field from the project.
Can I send videos through the API?
Not at this time: the integration API accepts PDFs and images. Drop videos into the app.
Photos or video: which should I use?
Photos for a few specific defects. A video for a full walkthrough. For photos, see Detecting damage in photos with AI.